All posts in nginx

Hallo zusammen,

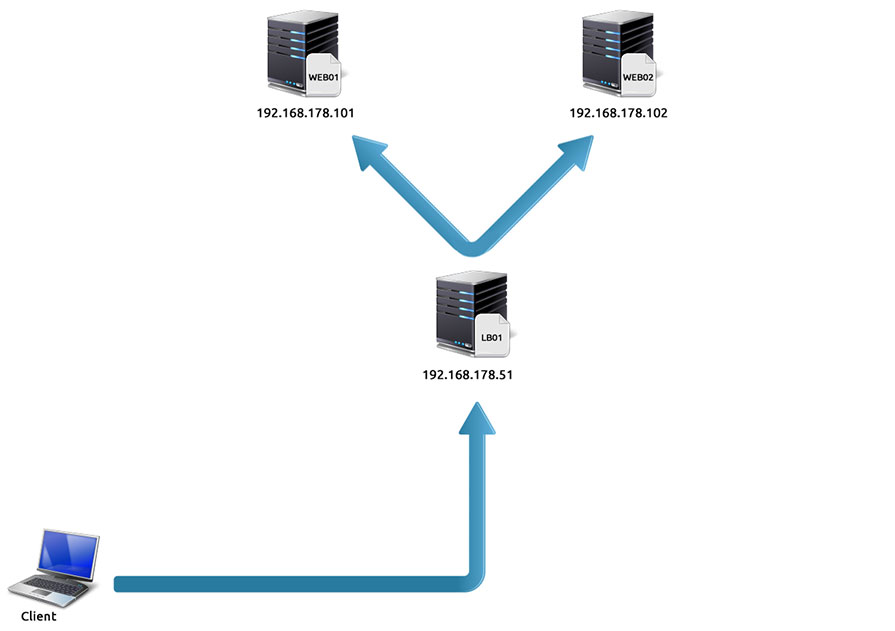
in dem heutigen Blogeintrag möchte ich euch zeige wie Ihr unter Ubuntu 16.04 einen einfachen Loadbalancer mit HA-Proxy installieren könnt. Für das Howto habe ich drei Ubuntu 16.04 Server installiert. Zwei Server dienen mir als Webserver und einer als Loadbalancer.


Um einen nginx Webserver installieren zu können, benötigt es noch ein paar vorbereitungen.

Nach der Grundinstallation der beiden Webserver, müssen diese auf den neusten Stand gebracht werden.
Nach dem Login, wechselt man zum root Benutzer mit:

sudo -i oder sudo su -
apt update -y && apt upgrade -y

Nach dem das System up to date ist, konfiguriert man den beiden Server einee statischen IP-Adresse.
Hier habe ich mich an den Screenshot gehalten, der Webserver 1 bekommt die IP-Adresse 192.168.xxx.101 und der Webserver 2 die IP-Adresse 192.168.xxx.102.

vim /etc/network/interfaces

auto enp0s3
iface enp0s3 inet static
  address 192.168.xxx.xxx
  netmask 255.255.255.0
  gateway 192.168.xxx.xxx
  dns-search htdom.local
  dns-nameservers 192.168.xxx.xxx

reboot
## nginx Webserver installieren und überprüfen
##
apt-get install nginx apache2-utils ssh
dpkg --get-selections nginx apache2-utils
dpkg -l | grep nginx

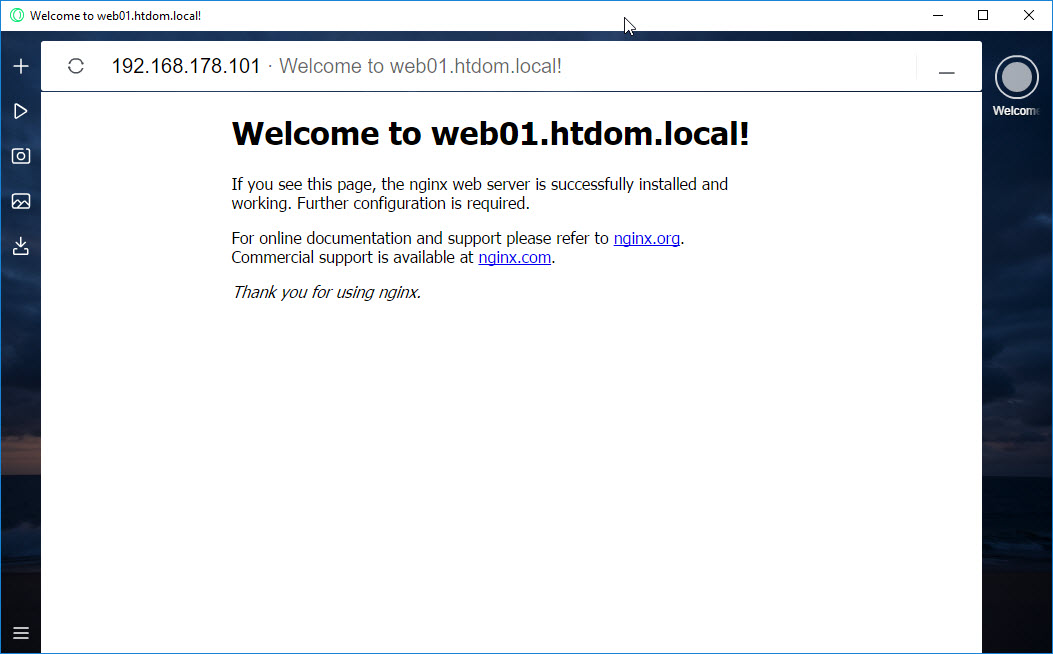
Zur besseren Übersicht habe ich die /var/www/html/index.nginx-debian.html angepasst, damit man diese in den Screenshots besser erkennt.


Nach dem die Webserver fertig installiert sind und man auf diese sauber zugreifen kann, werden wir den Loadbalancer vorbereiten.

Auch der Loadbalancer muss auf den neusten Stand gebracht werden.
Nach dem Login, wechselt man zum root Benutzer mit:

sudo -i oder sudo su -
apt update -y && apt upgrade -y

Nach dem das System up to date ist, konfiguriert man auch dem Loadbalancer eine statischen IP-Adresse. Hier habe ich die IP-Adresse 192.168.xxx.51 benutzt.

vim /etc/network/interfaces

auto enp0s3
iface enp0s3 inet static
  address 192.168.xxx.xxx
  netmask 255.255.255.0
  gateway 192.168.xxx.xxx
  dns-search htdom.local
  dns-nameservers 192.168.xxx.xxx

reboot
## HA-Proxy installieren und überprüfen
##
apt install haproxy -y
dpkg --get-selections haproxy
dpkg -l | grep haproxy
## HA-Proxy Konfigurationsdateien sichern
##
mv /etc/haproxy/haproxy.cfg /etc/haproxy/haproxy.old
cp /etc/default/haproxy /etc/default/haproxy.old
## /etc/default/haproxy ##
##
vim /etc/default/haproxy

## Set ENABLED to 1 if you want the init script to start haproxy.
ENABLED=1
## Basis Konfiguration des HAProxy Dienst
##
vim /etc/haproxy/haproxy.cfg

## Basic Settings
##
global
  daemon

defaults
  mode http #tcp

frontend http-incoming
  bind 192.168.178.51:80
  default_backend webservers

backend webservers
  balance roundrobin #leastconn and #source
  server web01 192.168.178.101:80
  server web02 192.168.178.102:80

systemctl restart haproxy.service
systemctl status haproxy.service

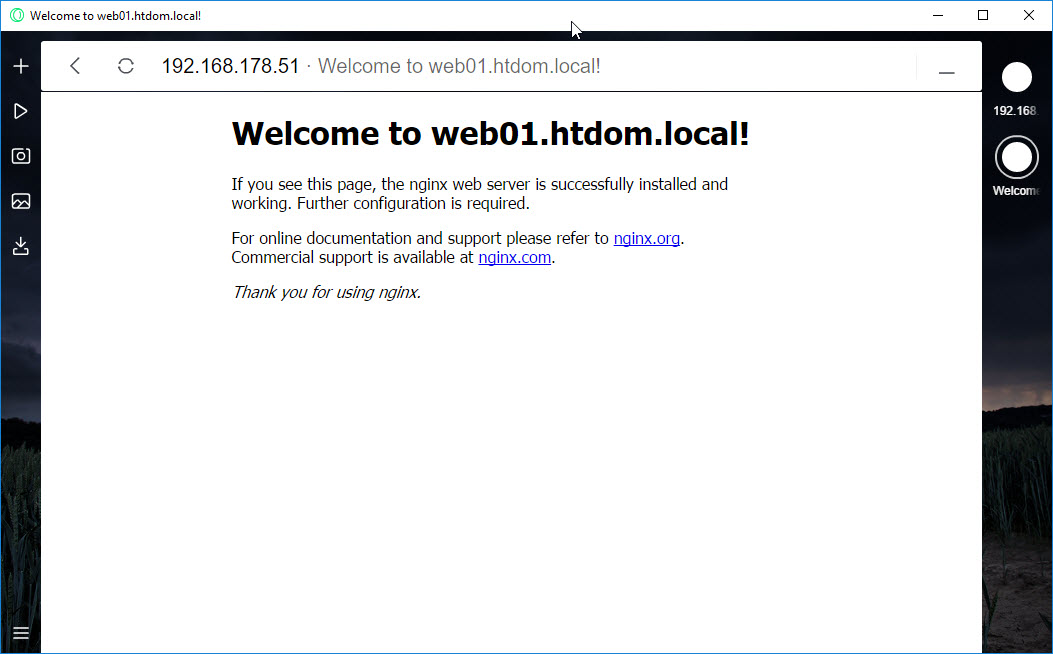
Hier ruft man im Webbrowser nun die IP-Adresse (192.168.xxx.51) des Loadbalancer auf, wenn man die Webseite mit F5 refreshed, dann sieht man das Roundrobin verhalten. Wenn man in der /etc/haproxy/haproxy.cfg Konfigurationsdatei den mode auf tcp stellt, dann wird erst dann ein Roundroubin durchgeführt, wenn einer der Webserver down ist.

Dies kann man testen in dem man auf den Webservern den nginx Dienst stoppt. (systemctl stop nginx.service oder service nginx stop)


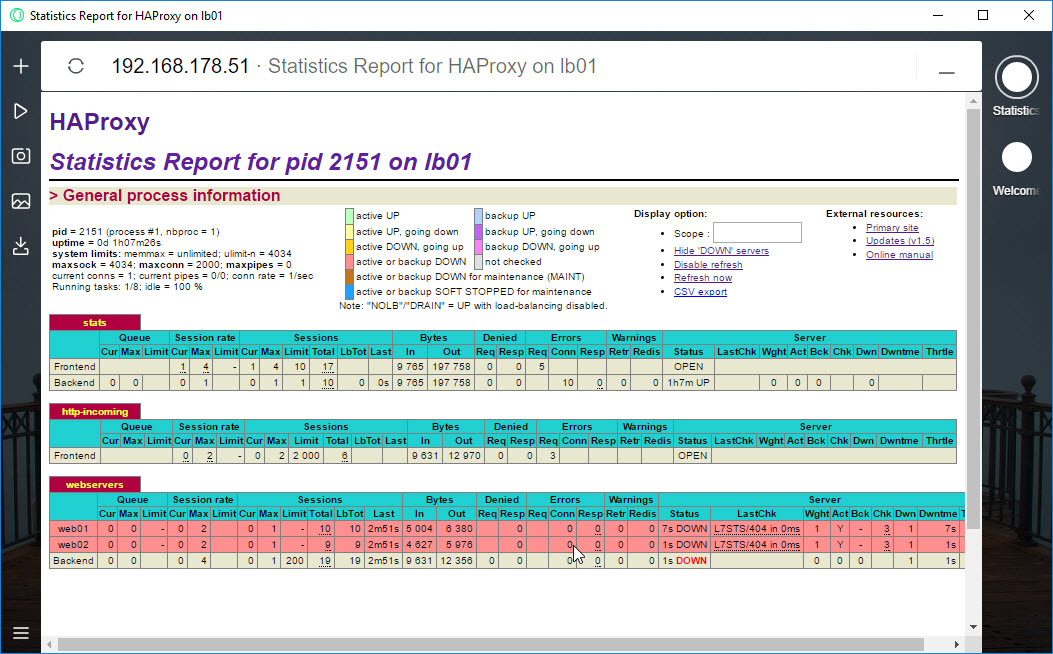
## Basis Konfiguration des HAProxy mit Statistics Report
##
vim /etc/haproxy/haproxy.cfg

## Global Settings
##
global
  daemon
  stats socket /run/haproxy/admin.sock mode 660 level admin 
  stats timeout 30s
  user haproxy
  group haproxy

## Default Settings
##
defaults
  log global 
  mode http #tcp
  option httplog

  timeout connect 5000
  timeout client 50000
  timeout server 50000

  retries 3

  errorfile 400 /etc/haproxy/errors/400.http
  errorfile 403 /etc/haproxy/errors/403.http
  errorfile 408 /etc/haproxy/errors/408.http
  errorfile 500 /etc/haproxy/errors/500.http
  errorfile 502 /etc/haproxy/errors/502.http
  errorfile 503 /etc/haproxy/errors/503.http
  errorfile 504 /etc/haproxy/errors/504.http

## Listen Settings
##
listen stats 
  bind 192.168.178.51:12345
  mode http

  maxconn 10

  stats enable
  stats hide-version
  stats refresh 30s
  stats show-node
  stats realm Loadbalanced\ Servers
  stats uri /stats
  stats auth admin:password

## Frontend Settings
##
frontend http-incoming
  bind 192.168.178.51:80
  default_backend webservers

## Backend Settings
##
backend webservers
  balance roundrobin #leastconn and #source
  option httpchk GET /webserver_check
  server web01 192.168.178.101:80 check inter 500 fall 3 rise 2
  server web02 192.168.178.102:80 check inter 500 fall 3 rise 2
## Konfiguration überprüfen
##
haproxy -f /etc/haproxy/haproxy.cfg -c


## Um die Option httpchk aktiv schalten zu können muss auf allen Webservern
## die webserver_check in das Root Verzeichnis abgelegt werden.
## Nach dieser Datei hällt dann der Loadbalancer ausschau.

touch /var/www/html/webserver_check


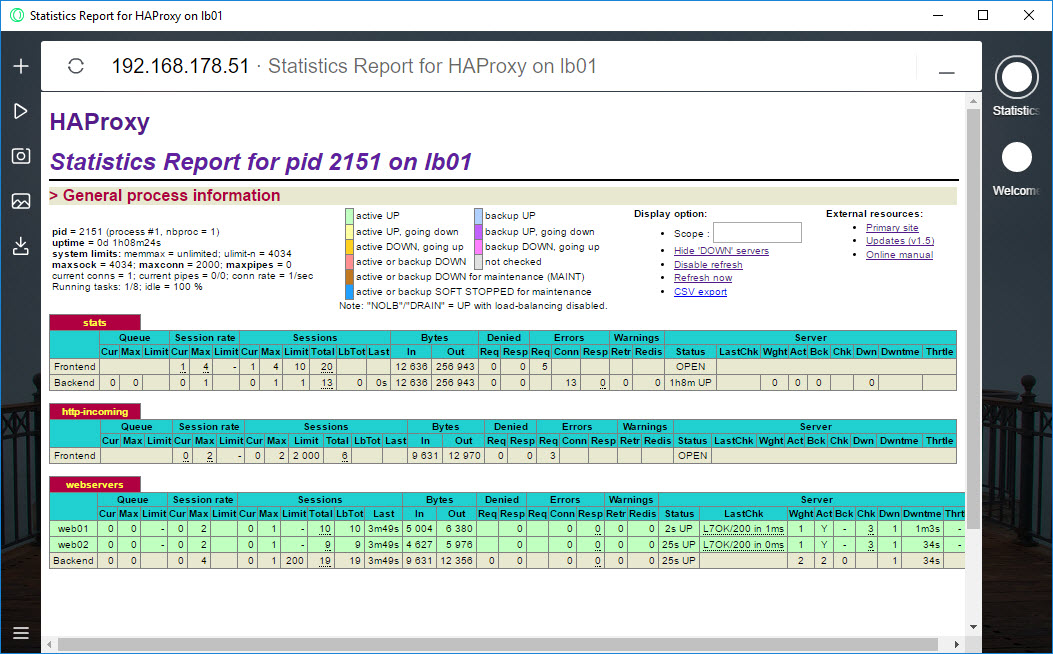
## HAProxy Statistics Report
##
http://192.168.178.51:12345/stats

Username: admin
Passwort: password

So das war es auch schon wieder von mir, viel Spaß beim konfigurieren.

Gruß Helmut


Hallo zusammen,

um den Nextcloud Server installieren zu können, benötigt es ein paar Vorbereitungen.
In diesen Beispiel verwende wir einen Ubuntu 16.04 LTS Server in einer Virtuellen Umgebung.

Nach der Grundinstallation des Ubuntu Servers, muss der Server auf den neusten Stand gebracht werden.
Nach dem Login, wechselt man zum root Benutzer mit:

sudo -i oder sudo su -
apt install ssh vim
apt update && apt upgrade -y

nginx Webserver installieren und überprüfen

apt install nginx nginx-extras apache2-utils ssh
dpkg -l | grep nginx

MariaDB Server installieren & Konfigurieren

apt install mariadb-server
dpkg -l | grep mariadb

mysql_secure_installation

cp /etc/mysql/my.cnf /etc/mysql/my.cnf.bak
vim /etc/mysql/my.cnf

[server]
skip-name-resolve
innodb_buffer_pool_size = 128M
innodb_buffer_pool_instances = 1
innodb_flush_log_at_trx_commit = 2
innodb_log_buffer_size = 32M
innodb_max_dirty_pages_pct = 90
query_cache_type = 1
query_cache_limit = 2M
query_cache_min_res_unit = 2k
query_cache_size = 64M
tmp_table_size= 64M
max_heap_table_size= 64M
slow-query-log = 1
slow-query-log-file = /var/log/mysql/slow.log
long_query_time = 1

#
[client-server]

# Import all .cnf files from configuration directory
!includedir /etc/mysql/conf.d/
!includedir /etc/mysql/mariadb.conf.d/

[client]
default-character-set = utf8mb4
[mysqld]
character-set-server  = utf8mb4
collation-server      = utf8mb4_general_ci
binlog_format = MIXED

systemctl start mysql.service
systemctl status mysql.service

NextCloud Datenbank anlegen

mysql -u root -p

CREATE DATABASE nextcloudDB;
USE nextcloudDB;

CREATE USER nextcloudDB@localhost IDENTIFIED BY 'nextcloudDB';
GRANT ALL PRIVILEGES ON nextcloudDB.* TO 'nextcloudDB'@'localhost' IDENTIFIED BY 'DeinPassword';
FLUSH PRIVILEGES;
quit

mysql -u nextcloudDB -p nextcloudDB
DeinPassword
quit

PHP 7 installieren

apt install libxml2-dev php php-gettext php-pear php-dompdf php-sabre-xml php-apcu php-imagick php7.0-fpm php7.0-gd php7.0-mysql php7.0-curl php7.0-xml php7.0-zip php7.0-bz2 php7.0-intl php7.0-mcrypt php7.0-mbstring php7.0-json php7.0-xsl php7.0-bcmath php7.0-cgi php7.0-cli php7.0-common  php7.0-imap

php.ini Datei anpassen

cp /etc/php/7.0/fpm/php.ini /etc/php/7.0/fpm/php.old
vim /etc/php/7.0/fpm/php.ini

memory_limit = 512M
post_max_size = 200M
cgi.fix_pathinfo=1
upload_max_filesize = 200M
date.timezone = Europe/Berlin

oder

egrep "memory_limit|date.timezone|cgi.fix_pathinfo|upload_max_filesize|post_max_size" /etc/php/7.0/fpm/php.ini

sed -i "s/memory_limit = .*/memory_limit = 512M/" /etc/php/7.0/fpm/php.ini
sed -i "s/;date.timezone.*/date.timezone = Europe\/\Berlin/" /etc/php/7.0/fpm/php.ini
sed -i "s/;cgi.fix_pathinfo=1/cgi.fix_pathinfo=1/" /etc/php/7.0/fpm/php.ini
sed -i "s/upload_max_filesize = .*/upload_max_filesize = 200M/" /etc/php/7.0/fpm/php.ini
sed -i "s/post_max_size = .*/post_max_size = 200M/" /etc/php/7.0/fpm/php.ini

fpm www.conf Datei anpassen

nano /etc/php/7.0/fpm/pool.d/www.conf

...
;listen = /run/php/php7.0-fpm.sock
listen = 127.0.0.1:9000

env[HOSTNAME] = $HOSTNAME
env[PATH] = /usr/local/sbin:/usr/local/bin:/usr/sbin:/usr/bin:/sbin:/bin
env[TMP] = /tmp 
env[TMPDIR] = /tmp
env[TEMP] = /tmp

service php7.0-fpm restart
service php7.0-fpm status

NextCloud 11 installieren

cd /tmp
wget https://download.nextcloud.com/server/releases/nextcloud-11.0.1.zip
unzip nextcloud-11.0.1.zip
mv nextcloud /var/www/
chown -R www-data: /var/www/nextcloud

SSL Zertifikat über eigene CA erstellen

cd /opt/ca/IssuingCA

openssl genrsa -aes256 -out private/nextcloud_htdom_local_without_pwd.key 2048 -rand private/.randIssuingCA
chmod 0400 private/nextcloud_htdom_local_without_pwd.key

openssl req -new -key private/nextcloud_htdom_local_without_pwd.key -out newcerts/nextcloud.htdom.local.csr -config ca-config.cnf
Enter pass phrase for private/nextcloud_htdom_local_without_pwd.key:
You are about to be asked to enter information that will be incorporated
into your certificate request.
What you are about to enter is what is called a Distinguished Name or a DN.
There are quite a few fields but you can leave some blank
For some fields there will be a default value,
If you enter '.', the field will be left blank.
-----
Country Name (2 letter code) [DE]:
State or Province Name (Bayern) [Bayern]:
Locality Name (Muenchen) [Muenchen]:
Organization Name (Company name or your Name) [Helmut Thurnhofer]:
Organizational Unit Name (Department) [IT]:
Common Name (Server FQDN or your Name) []:nextcloud.htdom.local
...

openssl ca -name IssuingCA -in newcerts/nextcloud.htdom.local.csr -out certs/nextcloud.htdom.local.crt -extensions server_cert -config ca-config.cnf
Using configuration from ca-config.cnf
Enter pass phrase for /opt/ca/IssuingCA/private/IssuingCA.key:
Check that the request matches the signature
Signature ok
Certificate Details:
        Serial Number: 1 (0x1)
        Validity
            Not Before: Feb  7 20:10:54 2017 GMT
            Not After : Feb  5 20:10:54 2027 GMT
        Subject:
            countryName               = DE
            stateOrProvinceName       = Bayern
            organizationName          = Helmut Thurnhofer
            organizationalUnitName    = IT
            commonName                = nextcloud.htdom.local
        X509v3 extensions:
            X509v3 Basic Constraints:
                CA:FALSE
            X509v3 Key Usage:
                Digital Signature, Non Repudiation, Key Encipherment, Data Encipherment
            X509v3 Extended Key Usage:
                TLS Web Server Authentication
            Authority Information Access:
                CA Issuers - URI:http://nextcloud.htdom.local/cert/IssuingCA.html

            X509v3 CRL Distribution Points:

                Full Name:
                  URI:http://nextcloud.htdom.local/cert/IssuingCA.crl

Certificate is to be certified until Feb  5 20:10:54 2027 GMT (3650 days)
Sign the certificate? [y/n]:y

1 out of 1 certificate requests certified, commit? [y/n]y
Write out database with 1 new entries
Data Base Updated

## Keydatei erstellen mit Passwort (Ansonsten muss bei jeden Neustart des Servers die Passphrase eingegeben werden)
##
openssl rsa -in private/nextcloud_htdom_local_without_pwd.key | cat

-----BEGIN RSA PRIVATE KEY-----
MIIEpQIBAAKCAQEArbdXG8+BUxm0NvO2pWXdx/0L3z/Nb+enAWqL59PzOuL63vXv
...
WyYHO6o4iUROOuJ9I0t0KsEDqkgh+VEOtcVfh8/gZ9IXyfXFyRhu09Q=
-----END RSA PRIVATE KEY-----

vim private/nextcloud.htdom.local.key
chmod 0400 private/nextcloud.htdom.local.key

oder man erstellt sich ein.

SelfSign SSL Zertifikat

openssl rand -out /etc/ssl/private/.randServer 8192
chmod 0400 /etc/ssl/private/.randServer

openssl genrsa -aes256 -out /etc/ssl/private/nextcloud_htdom_local_without_pwd.key 4096 -rand /etc/ssl/private/.randServer
chmod 0400 /etc/ssl/private/nextcloud_htdom_local_without_pwd.key

openssl rsa -in /etc/ssl/private/nextcloud_htdom_local_without_pwd.key | cat

-----BEGIN RSA PRIVATE KEY-----
MIIEpQIBAAKCAQEArbdXG8+BUxm0NvO2pWXdx/0L3z/Nb+enAWqL59PzOuL63vXv
...
WyYHO6o4iUROOuJ9I0t0KsEDqkgh+VEOtcVfh8/gZ9IXyfXFyRhu09Q=
-----END RSA PRIVATE KEY-----

vim /etc/ssl/private/nextcloud.htdom.local.key
chmod 0400 /etc/ssl/private/nextcloud.htdom.local.key

openssl req -new -key /etc/ssl/private/nextcloud.htdom.local.key -sha256 -out /etc/ssl/certs/nextcloud.htdom.local.csr
openssl x509 -req -days 365 -in /etc/ssl/certs/nextcloud.htdom.local.csr -signkey /etc/ssl/private/nextcloud.htdom.local.key -out /etc/ssl/certs/nextcloud.htdom.local.crt

nginx Webserver Konfiguration

vim /etc/nginx/sites-available/nextcloud.conf

upstream php-handler {
    server 127.0.0.1:9000;
}

server {
    listen 80 default_server;
    listen [::]:80 default_server;
    # enforce https
    return 301 https://$host$request_uri;

    access_log /var/log/nginx/access_nextcloud_htdom_local.log;
    error_log /var/log/nginx/error_nextcloud_htdom_local.log;
}

server {
    listen 443 ssl http2;
    listen [::]:443 ssl http2;

    ssl_certificate /etc/ssl/certs/nextcloud.htdom.local.crt;
    ssl_certificate_key /etc/ssl/private/nextcloud_htdom_local.key;

    ssl_session_timeout 1d;
    ssl_session_cache shared:SSL:50m;
    ssl_session_tickets off;

    ## modern configuration. tweak to your needs.
    ssl_protocols TLSv1.2;
    ssl_ciphers 'ECDHE-ECDSA-AES256-GCM-SHA384:ECDHE-RSA-AES256-GCM-SHA384:ECDHE-ECDSA-CHACHA20-POLY1305:ECDHE-RSA-CHACHA20-POLY1305:ECDHE-ECDSA-AES128-GCM-SHA256:ECDHE-RSA-AES128-GCM-SHA256:ECDHE-ECDSA-AES256-SHA384:ECDHE-RSA-AES256-SHA384:ECDHE-ECDSA-AES128-SHA256:ECDHE-RSA-AES128-SHA256';
    ssl_prefer_server_ciphers on;

    ## HSTS (ngx_http_headers_module is required) (15768000 seconds = 6 months)
    add_header Strict-Transport-Security max-age=15768000;

    # Add headers to serve security related headers
    # Before enabling Strict-Transport-Security headers please read into this
    # topic first.
    # add_header Strict-Transport-Security "max-age=15768000;
    # includeSubDomains; preload;";
    add_header X-Content-Type-Options nosniff;
    add_header X-Frame-Options "SAMEORIGIN";
    add_header X-XSS-Protection "1; mode=block";
    add_header X-Robots-Tag none;
    add_header X-Download-Options noopen;
    add_header X-Permitted-Cross-Domain-Policies none;

    # Path to the root of your installation
    root /var/www/nextcloud/;

    location = /robots.txt {
        allow all;
        log_not_found off;
        access_log off;
    }

    # The following 2 rules are only needed for the user_webfinger app.
    # Uncomment it if you're planning to use this app.
    #rewrite ^/.well-known/host-meta /public.php?service=host-meta last;
    #rewrite ^/.well-known/host-meta.json /public.php?service=host-meta-json
    # last;

    location = /.well-known/carddav {
      return 301 $scheme://$host/remote.php/dav;
    }
    location = /.well-known/caldav {
      return 301 $scheme://$host/remote.php/dav;
    }

    # set max upload size
    client_max_body_size 512M;
    fastcgi_buffers 64 4K;

    # Disable gzip to avoid the removal of the ETag header
    gzip off;

    # Uncomment if your server is build with the ngx_pagespeed module
    # This module is currently not supported.
    #pagespeed off;

    error_page 403 /core/templates/403.php;
    error_page 404 /core/templates/404.php;

    location / {
        rewrite ^ /index.php$uri;
    }

    location ~ ^/(?:build|tests|config|lib|3rdparty|templates|data)/ {
        deny all;
    }
    location ~ ^/(?:\.|autotest|occ|issue|indie|db_|console) {
        deny all;
    }

    location ~ ^/(?:index|remote|public|cron|core/ajax/update|status|ocs/v[12]|updater/.+|ocs-provider/.+|core/templates/40[34])\.php(?:$|/) {
        include fastcgi_params;
        fastcgi_split_path_info ^(.+\.php)(/.*)$;
        fastcgi_param SCRIPT_FILENAME $document_root$fastcgi_script_name;
        fastcgi_param PATH_INFO $fastcgi_path_info;
        fastcgi_param HTTPS on;

        #Avoid sending the security headers twice
        fastcgi_param modHeadersAvailable true;
        fastcgi_param front_controller_active true;
        fastcgi_pass php-handler;
        fastcgi_intercept_errors on;
        fastcgi_request_buffering off;
    }

    location ~ ^/(?:updater|ocs-provider)(?:$|/) {
        try_files $uri/ =404;
        index index.php;
    }

    # Adding the cache control header for js and css files
    # Make sure it is BELOW the PHP block
    location ~* \.(?:css|js|woff|svg|gif)$ {
        try_files $uri /index.php$uri$is_args$args;
        add_header Cache-Control "public, max-age=7200";
        # Add headers to serve security related headers (It is intended to
        # have those duplicated to the ones above)
        # Before enabling Strict-Transport-Security headers please read into
        # this topic first.
        # add_header Strict-Transport-Security "max-age=15768000;
        #  includeSubDomains; preload;";
        add_header X-Content-Type-Options nosniff;
        add_header X-Frame-Options "SAMEORIGIN";
        add_header X-XSS-Protection "1; mode=block";
        add_header X-Robots-Tag none;
        add_header X-Download-Options noopen;
        add_header X-Permitted-Cross-Domain-Policies none;
        # Optional: Don't log access to assets
        access_log off;
    }

    location ~* \.(?:png|html|ttf|ico|jpg|jpeg)$ {
        try_files $uri /index.php$uri$is_args$args;
        # Optional: Don't log access to other assets
        access_log off;
    }
}

nginx überprüfen und restliche Konfiguration vornehmen

nginx -t

unlink /etc/nginx/sites-enabled/default
mv /etc/nginx/sites-available/default{,.old}

ln -s /etc/nginx/sites-available/nextcloud.conf /etc/nginx/sites-enabled/
systemctl restart nginx.service
systemctl status nginx.service

Memory Cache konfigurieren

apt-cache policy php-apcu
apt install php-apcu

systemctl restart nginx.service

nano /var/www/nextcloud/config/config.php
<?php
$CONFIG = array (
  'memcache.local' => '\OC\Memcache\APCu',
  ...
  'trusted_domains' =>
  array (
    0 => '192.168.178.2',
    1 => 'nextcloud.htdom.local',
  ),

systemctl restart nginx.service
systemctl status nginx.service


Viel Spaß beim konfigurieren

Gruß Helmut


Hallo zusammen,

um einen nginx Webserver installieren zu können, benötigt es ein paar Vorbereitungen.
In diesen Beispiel verwende wir einen Ubuntu 16.04 LTS Server in einer Virtuellen Umgebung.

Nach der Grundinstallation des Servers, muss der Server auf den neusten Stand gebracht werden.
Nach dem Login, wechselt man zum root Benutzer mit:

sudo -i oder sudo su -
apt update -y && apt upgrade -y
reboot

Nach dem das System up to date ist, konfiguriert man den Server mit einer statischen IP-Adresse.

vim /etc/network/interfaces

auto enp0s3
iface enp0s3 inet static
  address 192.168.xxx.xxx
  netmask 255.255.255.0
  gateway 192.168.xxx.xxx
  dns-search htdom.local
  dns-nameservers 192.168.xxx.xxx 192.168.xxx.xxx

systemctl restart networking.service
systemctl status networking.service

nginx Webserver installation und überprüfen

apt-get install nginx apache2-utils ssh
dpkg -l | grep nginx

Standardverzeichnisse nach der Installation

tree /etc/nginx

/etc/nginx/
├── conf.d
├── fastcgi.conf
├── fastcgi_params
├── koi-utf
├── koi-win
├── mime.types
├── nginx.conf
├── proxy_params
├── scgi_params
├── sites-available
│   └── default
├── sites-enabled
│   └── default -> /etc/nginx/sites-available/default
├── snippets
│   ├── fastcgi-php.conf
│   └── snakeoil.conf
├── uwsgi_params
└── win-utf


tree /var/www

/var/www/
└── html
    └── index.nginx-debian.html

Grundlegende nginx Befehle

## Mit folgenden Befehlen kann man den nginx Server starten/stoppen/reloaden/configtest durchführen bzw. den Status abfragen
##
service nginx {start|stop|restart|reload|force-reload|status|configtest|rotate|upgrade}

## Der wichtigste Befehl nach jeder Konfigurationsanpassung ist immer.
##
nginx -t
nginx: the configuration file /etc/nginx/nginx.conf syntax is ok
nginx: configuration file /etc/nginx/nginx.conf test is successful

oder

service nginx configtest
* Testing nginx configuration
  ...done.

Mit folgenden Befehl überprüft man, ob der nginx Server auf Port 80 lauscht

netstat -antlp | grep nginx
tcp        0      0 0.0.0.0:80              0.0.0.0:*               LISTEN      4236/nginx -g daemo
tcp6       0      0 :::80                   :::*                    LISTEN      4236/nginx -g daemo

PID File Anpassung in der nginx.service Datei

## Nach jedem Neustart des nginx Services, wird eine Fehlermeldung ausgegeben, das die nginx.pid nicht gelesen/gefunden wird.
## Daher wurde hier eine kleine Anpassung an der nginx.service & nginx.conf Datei vorgenommen.
##
systemctl status nginx.service
● nginx.service - A high performance web server and a reverse proxy server
   Loaded: loaded (/lib/systemd/system/nginx.service; enabled; vendor preset: enabled)
   ...
Jan 19 16:08:53 web01 systemd[1]: Starting A high performance web server and a reverse proxy server...
Jan 19 16:08:53 web01 systemd[1]: nginx.service: Failed to read PID from file /run/nginx.pid: Invalid argument


vim /lib/systemd/system/nginx.service
[Service]
Type=forking
PIDFile=/var/run/nginx.pid
...
ExecStop=-/sbin/start-stop-daemon --quiet --stop --retry QUIT/5 --pidfile /var/run/nginx.pid
. . .

vim /etc/nginx/nginx.conf
http {
    # pid /var/run/nginx.pid;
    . . .
}

systemctl restart nginx.service
systemctl daemon-reload

systemctl status nginx.service
● nginx.service - A high performance web server and a reverse proxy server
   Loaded: loaded (/lib/systemd/system/nginx.service; enabled; vendor preset: enabled)
   ...
Jan 19 16:10:00 web01 systemd[1]: Starting A high performance web server and a reverse proxy server...
Jan 19 16:10:00 web01 systemd[1]: Started A high performance web server and a reverse proxy server.

Erste Webseite konfigurieren

## Als erstes entfernen wir den Standardlink unter sites-enabled und machen eine Sicherungskopie der /etc/nginx/default Datei.

unlink /etc/nginx/sites-enabled/default
mv /etc/nginx/sites-available/default{,.old}

mv /var/www/html/index.nginx-debian.html /var/www/html/index.html
mv /var/www/html/ /var/www/mysite_htdom_local

vim /etc/nginx/sites-available/mysite.htdom.local

## Default Server Konfiguration ohne https und rewrite
##
server {
  listen 80;
  listen [::]:80;

  server_name mysite.htdom.local;
  root /var/www/mysite_htdom_local;
  index index.html;

  access_log /var/log/nginx/access_mysite_htdom_local.log;
  error_log /var/log/nginx/error_mysite_htdom_local.log;
}

ln -s /etc/nginx/sites-available/mysite.htdom.local /etc/nginx/sites-enabled/

systemctl reload nginx.service


Virtuellen Host konfigurieren

mkdir -p /var/www/site1_htdom_local
sudo chown -R root:root /var/www/site1_htdom_local

vim /etc/nginx/sites-available/site1.htdom.local

## Default Server Konfiguration ohne https und rewrite
##
server {
  listen 80;
  listen [::]:80;

  server_name site1.htdom.local;
  root /var/www/site1_htdom_local;
  index index.html;

  access_log /var/log/nginx/access_site1_htdom_local.log;
  error_log /var/log/nginx/error_site1_htdom_local.log;
}

ln -s /etc/nginx/sites-available/site1.htdom.local /etc/nginx/sites-enabled/

systemctl reload nginx.service

ls -la /etc/nginx/sites-enabled/
...
lrwxrwxrwx 1 root root   45 Jan 19 18:45 mysite.htdom.local -> /etc/nginx/sites-available/mysite.htdom.local
lrwxrwxrwx 1 root root   44 Jan 20 15:58 site1.htdom.local -> /etc/nginx/sites-available/site1.htdom.local


Webserver SSL Zertifikat erstellen

cd /opt/ca/IssuingCA/

openssl genrsa -aes256 -out private/mysite.htdom.local.key 2048 -rand private/.randIssuingCA
chmod 0400 private/mysite.htdom.local.key

openssl req -new -key private/mysite.htdom.local.key -out newcerts/mysite.htdom.local.csr -config ca-config.cnf

Enter pass phrase for private/mysite.htdom.local.key:
You are about to be asked to enter information that will be incorporated
into your certificate request.
What you are about to enter is what is called a Distinguished Name or a DN.
There are quite a few fields but you can leave some blank
For some fields there will be a default value,
If you enter '.', the field will be left blank.
-----
Country Name (2 letter code) [DE]:
State or Province Name (Bayern) [Bayern]:
Locality Name (Muenchen) [Muenchen]:
Organization Name (Company name or your Name) [HTDOM Company GmbH]:
Organizational Unit Name (Department) [IT]:IT-Support
Common Name (Server FQDN or your Name) []:mysite.htdom.local
...

-----------------------------------------------------------------------
openssl ca -name IssuingCA -in newcerts/mysite.htdom.local.csr -out certs/mysite.htdom.local.crt -extensions server_cert -config ca-config.cnf

Using configuration from ca-config.cnf
Enter pass phrase for /opt/ca/IssuingCA/private/IssuingCA.key:
Check that the request matches the signature
Signature ok
Certificate Details:
        Serial Number: 1 (0x1)
        Validity
            Not Before: Jan 22 13:14:33 2017 GMT
            Not After : Jan 20 13:14:33 2027 GMT
        Subject:
            countryName               = DE
            stateOrProvinceName       = Bayern
            organizationName          = HTDOM Company GmbH
            organizationalUnitName    = IT-Support
            commonName                = mysite.htdom.local
        X509v3 extensions:
            X509v3 Basic Constraints:
                CA:FALSE
            X509v3 Key Usage:
                Digital Signature, Non Repudiation, Key Encipherment, Data Encipherment
            X509v3 Extended Key Usage:
                TLS Web Server Authentication
            Authority Information Access:
                CA Issuers - URI:http://mysite.htdom.local/cert/IssuingCA.html

            X509v3 CRL Distribution Points:

                Full Name:
                  URI:http://mysite.htdom.local/cert/IssuingCA.crl

Certificate is to be certified until Jan 20 13:14:33 2027 GMT (3650 days)
Sign the certificate? [y/n]:y

1 out of 1 certificate requests certified, commit? [y/n]y
Write out database with 1 new entries
Data Base Updated

-----------------------------------------------------------------------

## Keydatei erstellen mit Passwort (Ansonsten muss bei jeden Neustart des Servers die Passphrase eingegeben werden)
##
openssl rsa -in private/mysite.htdom.local.key | cat

-----BEGIN RSA PRIVATE KEY-----
MIIEpQIBAAKCAQEArbdXG8+BUxm0NvO2pWXdx/0L3z/Nb+enAWqL59PzOuL63vXv
...
WyYHO6o4iUROOuJ9I0t0KsEDqkgh+VEOtcVfh8/gZ9IXyfXFyRhu09Q=
-----END RSA PRIVATE KEY-----

vim private/mysite.htdom.local.with.pwd.key
chmod 0400 private/mysite.htdom.local.with.pwd.key

-----------------------------------------------------------------------

## Zertifikat auslesen und auf dem Webserver importieren
##
cat /opt/ca/IssuingCA/certs/mysite.htdom.local.crt | sed -n -e '/BEGIN\ CERTIFICATE/,/END\ CERTIFICATE/ p'
cat /opt/ca/IssuingCA/private/mysite.htdom.local.with.pwd.key

-----------------------------------------------------------------------

## Ansicht auf dem Webserver
##
ls -la certs/mysite.htdom.local.crt
-rw-r--r-- 1 root root 1866 Jan 22 14:21 certs/mysite.htdom.local.crt

ls -la private/mysite.htdom.local.with.pwd.key
-rw-r----- 1 root root 1675 Jan 22 14:22 private/mysite.htdom.local.with.pwd.key

chmod 0640 /etc/ssl/private/mysite.htdom.local.with.pwd.key

tree /var/www/mysite_htdom_local/
/var/www/mysite_htdom_local/
├── cert
│   ├── IssuingCA.crl
│   ├── IssuingCA.crt
│   ├── RootCA.crl
│   └── RootCA.crt
└── index.html

mysite.htdom.local Konfiguration anpassen

vim /etc/nginx/sites-available/mysite.htdom.local

## Default Server Konfiguration mit https und rewrite
##
server {
  listen 80 default_server;
  listen [::]:80 default_server;

## Redirect all HTTP requests to HTTPS with a 301 Moved Permanently response.
  return 301 https://$host$request_uri;

  access_log /var/log/nginx/access_mysite_htdom_local.log;
  error_log /var/log/nginx/error_mysite_htdom_local.log;
}

server {
  listen 443 ssl http2;
  listen [::]:443 ssl http2;

  root /var/www/mysite_htdom_local;
  index index.html;
    location / {
        try_files $uri $uri/ /index.html;
    }
  
## SSL Zertifikate
  ssl_certificate /etc/ssl/certs/mysite.htdom.local.crt;
  ssl_certificate_key /etc/ssl/private/mysite.htdom.local.with.pwd.key;
}

nginx -t
systemctl restart nginx.service
systemctl status nginx.service

Mit folgenden Befehl überprüft man, ob der nginx Server auf Port 80 und 443 lauscht

netstat -antlp | grep nginx
tcp        0      0 0.0.0.0:80              0.0.0.0:*               LISTEN      3776/nginx -g daemo
tcp        0      0 0.0.0.0:443             0.0.0.0:*               LISTEN      3776/nginx -g daemo
tcp6       0      0 :::80                   :::*                    LISTEN      3776/nginx -g daemo
tcp6       0      0 :::443                  :::*                    LISTEN      3776/nginx -g daemo


Um noch mehr Sicherheit in die TLS Verbindung zu bekommen, sollte man das TLS Protokoll und den Schlüsselaustausch (Chiper) eingrenzen.
Dazu gibt es eine sehr gute Webseite von Mozilla, mit dieser Mozilla SSL Configuration Generator kann man sich die passende Konfiguration für seinen Webserver zusammenklicken.

https://mozilla.github.io/server-side-tls/ssl-config-generator/

Modern: Ist Stand heute die sicherste Einstellung, hier wird nur noch TLSv1.2 verwendet
Intermediate: Ist ein kompromiss aus Sicherheit und Kompatibilität, hier wird noch TLSv1 TLSv1.1 TLSv1.2 verwendet.
Old: Ist die schlechterste Wahl, hier wird sogar noch das veraltete SSLv3 verwendet.

Alle heutigen Browser unterstützen bereits TLSv1.2 daher sollte man, wenn möglich Intermediate oder Modern benutzen.
Um die Konfiguration auf der Webseite vornehmen zu können, müssen wir erst die nginx und openssl Version herausfinden, dies funktioniert mit folgenden Befehl.

nginx -V
nginx version: nginx/1.10.0 (Ubuntu)
built with OpenSSL 1.0.2g  1 Mar 2016

Und so sieht meine Modern Konfiguration aus

## Default Server Konfiguration mit https/rewrite und Modern Konfiguration
##
server {
  listen 80 default_server;
  listen [::]:80 default_server;

## Redirect all HTTP requests to HTTPS with a 301 Moved Permanently response.
  return 301 https://$host$request_uri;

  access_log /var/log/nginx/access_mysite_htdom_local.log;
  error_log /var/log/nginx/error_mysite_htdom_local.log;
}

server {
  listen 443 ssl http2;
  listen [::]:443 ssl http2;

  root /var/www/mysite_htdom_local;
  index index.html;
    location / {
        try_files $uri $uri/ /index.html;
    }
  
## certs sent to the client in SERVER HELLO are concatenated in ssl_certificate
    ssl_certificate /etc/ssl/certs/mysite.htdom.local.crt;
    ssl_certificate_key /etc/ssl/private/mysite.htdom.local.with.pwd.key;

    ssl_session_timeout 1d;
    ssl_session_cache shared:SSL:50m;
    ssl_session_tickets off;

## modern configuration. tweak to your needs.
    ssl_protocols TLSv1.2;
    ssl_ciphers 'ECDHE-ECDSA-AES256-GCM-SHA384:ECDHE-RSA-AES256-GCM-SHA384:ECDHE-ECDSA-CHACHA20-POLY1305:ECDHE-RSA-CHACHA20-POLY1305:ECDHE-ECDSA-AES128-GCM-SHA256:ECDHE-RSA-AES128-GCM-SHA256:ECDHE-ECDSA-AES256-SHA384:ECDHE-RSA-AES256-SHA384:ECDHE-ECDSA-AES128-SHA256:ECDHE-RSA-AES128-SHA256';
    ssl_prefer_server_ciphers on;

## HSTS (ngx_http_headers_module is required) (15768000 seconds = 6 months)
    add_header Strict-Transport-Security max-age=15768000;
}

SSL/TLS Verbindungstest kann man auf folgender Webseite durchführen
https://www.ssllabs.com/ssltest/index.html

Wenn man nun die Variante Modern nutzt, könnte die Handshake Simulation wie folgt aussehen.
Alle Browser die kein TLSv1.2 unterstützen, werden abgewiesen, bzw. können keine Verbindung zum Webserver aufbauen.


Viel Spaß beim ausprobieren

Gruß Helmut