Hallo zusammen,
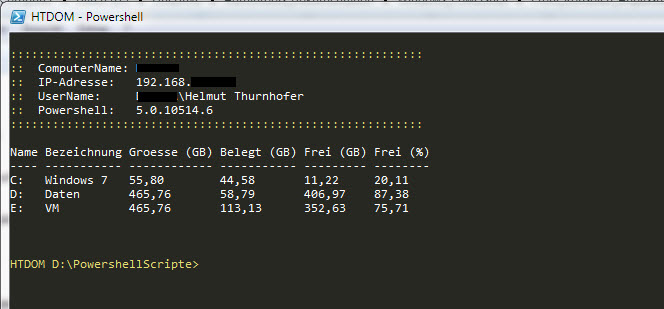
in dem heutigen Howto zeige ich euch ein kleines Skript, wie Ihr eure Powershell Umgebung auf allen Computern/Server gleich setzen könnt.
Bitte vor der Skript Ausführung eure ExecutionPolicy setzen
Set-ExecutionPolicy -ExecutionPolicy RemoteSigned -Force
Damit Powershell immer ein Startverzeichnis hat, bitte die passende Variable im Skript setzen
$StartFolder="C:\ oder D:\DeinVerzeichnis"
Und hier das Skript
#######################################################################################
## Skript: Powershell Profil Datei anlegen
## Name: Helmut Thurnhofer
## Datum: 03.01.2016
## Version: 1.0
##
## Powershell Konsolen Anpassung
## https://tobivnext.wordpress.com/2012/03/07/powershell-konsoleneigenschaften-anpassen/
##
## Bitte vor Skriptausführung ExecutionPolicy setzen
## Set-ExecutionPolicy -ExecutionPolicy RemoteSigned -Force
##
## Bitte auch einen passenden Startverzeichnis für Powershell setzen
## $StartFolder="C:\ oder D:\DeinVerzeichnis"
#######################################################################################
## Skript Variablen definieren ########################################################
$DateTime = (Get-Date -Format g)
$ProfileFile = $PROFILE.CurrentUserAllHosts
$SplitProfileFile = Split-Path -Path $ProfileFile -Leaf -Resolve
$SplitProfilePath = Split-Path -Path $ProfileFile -Parent -Resolve
$BackupProfileFile = $SplitProfilePath + "\" + "profile.bak"
$CheckProfileFile = Test-Path -PathType Leaf $ProfileFile
$StartFolder="D:\PowershellScripte"
#######################################################################################
## Startverzeichnis anlegen wenn noch nicht vorhanden #################################
If (!(Test-Path -Path $StartFolder)){
New-Item -Type Directory -Path $StartFolder
Write-Host "Der Ordner $StartFolder wurde angelegt" -ForegroundColor Green
} Else {
Write-Host "Der Ordner $StartFolder existiert bereits." -ForegroundColor Yellow
}
#######################################################################################
## Überprüfe ob alte profil.ps1 Datei vorhanden ist, wenn ja, wird diese umbenannt und neu angelegt.
If($CheckProfileFile -eq $true) {
Rename-Item -Path $ProfileFile -NewName $BackupProfileFile
Write-Host "Powershell Profil Datei (`"$BackupProfileFile`") wurde umbenannt!`n" -ForegroundColor Yellow
New-Item -ItemType File -Force $ProfileFile
Write-Host "Powershell Profil Datei (`"$ProfileFile`") wurde neu angelegt!`n" -ForegroundColor Green
} Else {
New-Item -ItemType File -Force $ProfileFile
Write-Host "Powershell Profil Datei (`"$ProfileFile`") wurde neu angelegt!`n" -ForegroundColor Green
}
#######################################################################################
## Schreibe Inhalt in die profile.ps1 Datei
Add-Content $ProfileFile -Value "#####################################################################################"
Add-Content $ProfileFile -Value "## Name: Windows PowerShell Profil"
Add-Content $ProfileFile -Value "## Ersteller: $env:USERNAME"
Add-Content $ProfileFile -Value "## Erstellungsdatum: $DateTime"
Add-Content $ProfileFile -Value "## Version: 1.0"
Add-Content $ProfileFile -Value "#####################################################################################"
Add-Content $ProfileFile -Value ""
Add-Content $ProfileFile -Value "## Skript von http://www.zerrouki.com/powershell-profile-example"
Add-Content $ProfileFile -Value "`$IPAddress=@(Get-WmiObject Win32_NetworkAdapterConfiguration | Where-Object {`$_.DefaultIpGateway})[0].IPAddress[0]"
Add-Content $ProfileFile -Value "`$PSVersion=(`$PSVersionTable.PSVersion).ToString()"
Add-Content $ProfileFile -Value "Clear-Host"
Add-Content $ProfileFile -Value ""
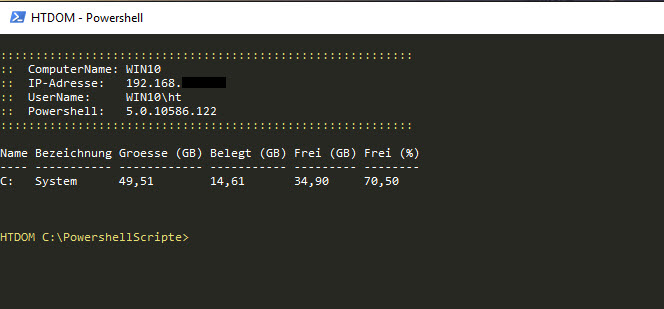
Add-Content $ProfileFile -Value "Write-Host `"``r``n:::::::::::::::::::::::::::::::::::::::::::::::::::::::::::`" -ForegroundColor Yellow"
Add-Content $ProfileFile -Value "Write-Host `"::`" -ForegroundColor Yellow -nonewline; Write-Host `" ComputerName: `$(`$env:COMPUTERNAME)`";"
Add-Content $ProfileFile -Value "Write-Host `"::`" -ForegroundColor Yellow -nonewline; Write-Host `" IP-Adresse: `$IPAddress`";"
Add-Content $ProfileFile -Value "Write-Host `"::`" -ForegroundColor Yellow -nonewline; Write-Host `" UserName: `$env:UserDomain\`$env:UserName`";"
Add-Content $ProfileFile -Value "Write-Host `"::`" -ForegroundColor Yellow -nonewline; Write-Host `" Powershell: `$PSVersion`" -NoNewline;"
Add-Content $ProfileFile -Value "Write-Host `"``r``n:::::::::::::::::::::::::::::::::::::::::::::::::::::::::::`" -ForegroundColor Yellow"
Add-Content $ProfileFile -Value ""
Add-Content $ProfileFile -Value "`$AllDisk = @()"
Add-Content $ProfileFile -Value "Get-WmiObject Win32_LogicalDisk -filter `"DriveType='3'`" | ForEach-Object {"
Add-Content $ProfileFile -Value " `$AllDisk += @(`$_ | Select @{n=`"Name`";e={`$_.Caption}},"
Add-Content $ProfileFile -Value " @{n=`"Bezeichnung`";e={`$_.VolumeName}},"
Add-Content $ProfileFile -Value " @{n=`"Groesse (GB)`";e={`"{0:N2}`" -f (`$_.Size/1GB)}},"
Add-Content $ProfileFile -Value " @{n=`"Belegt (GB)`";e={`"{0:N2}`" -f ((`$_.Size/1GB) - (`$_.FreeSpace/1GB))}},"
Add-Content $ProfileFile -Value " @{n=`"Frei (GB)`";e={`"{0:N2}`" -f (`$_.FreeSpace/1GB)}},"
Add-Content $ProfileFile -Value " @{n=`"Frei (%)`";e={if(`$_.Size) {`"{0:N2}`" -f ((`$_.FreeSpace/1GB) / (`$_.Size/1GB) * 100 )} else {`"NAN`"} }})"
Add-Content $ProfileFile -Value "}"
Add-Content $ProfileFile -Value "`$AllDisk | Format-Table -AutoSize | Out-String"
Add-Content $ProfileFile -Value ""
Add-Content $ProfileFile -Value "## Globale Standardvariablen setzen"
Add-Content $ProfileFile -Value "`$ErrorActionPreference = `"Continue`""
Add-Content $ProfileFile -Value ""
Add-Content $ProfileFile -Value "## Setzen das Startverzeichnis"
Add-Content $ProfileFile -Value "Set-Location -Path $StartFolder"
Add-Content $ProfileFile -Value ""
Add-Content $ProfileFile -Value "## Angepasster Powershell Titel"
Add-Content $ProfileFile -Value "`$a = (Get-Host).UI.RawUI"
Add-Content $ProfileFile -Value "`$a.WindowTitle = `"HTDOM - Powershell`""
Add-Content $ProfileFile -Value ""
Add-Content $ProfileFile -Value "## Angepasster PowerShell Prompt"
Add-Content $ProfileFile -Value "function prompt {"
Add-Content $ProfileFile -Value "`$msg = `"HTDOM `$(`$ExecutionContext.SessionState.Path.CurrentLocation)`$(`'>`' * (`$NestedPromptLevel + 1))`""
Add-Content $ProfileFile -Value "Write-Host -ForegroundColor Yellow -NoNewLine `$msg; `" `""
Add-Content $ProfileFile -Value "`}"
Add-Content $ProfileFile -Value ""
Add-Content $ProfileFile -Value "## Setzt bestimmte Alias und Funktionen"
Add-Content $ProfileFile -Value "function pss{Set-Location -Path $StartFolder}"
Add-Content $ProfileFile -Value "function c{Set-Location -Path C:\}"
Add-Content $ProfileFile -Value "function d{Set-Location -Path D:\}"
Add-Content $ProfileFile -Value ""
Add-Content $ProfileFile -Value "function ..{cd ..}"
Add-Content $ProfileFile -Value "function ...{cd ..\..}"
Add-Content $ProfileFile -Value "function ....{cd ..\..\..}"
Add-Content $ProfileFile -Value "function .....{cd ..\..\..\..}"
Add-Content $ProfileFile -Value ""
Add-Content $ProfileFile -Value "function ws{Set-Location -Path C:\Windows\System32}"
Add-Content $ProfileFile -Value "function npp{notepad `$PROFILE.CurrentUserAllHosts}"
Add-Content $ProfileFile -Value "function np{Start-Process -FilePath `"C:\Program Files (x86)\Notepad++\notepad++.exe`" -Verb RunAs}"
Add-Content $ProfileFile -Value "function ise{Start-Process -FilePath `"C:\Windows\System32\WindowsPowerShell\v1.0\powershell_ise.exe`" -Verb RunAs}"
Add-Content $ProfileFile -Value ""
Add-Content $ProfileFile -Value "function kb(`$id){Start-Process -FilePath `"http://support.microsoft.com/kb/`$id`"}"
Add-Content $ProfileFile -Value "function mwst(`$betrag, `$satz = 19) {`$betrag / 100 * `$satz}"
Add-Content $ProfileFile -Value ""
Add-Content $ProfileFile -Value "function applog{Get-EventLog -LogName Application -Newest 50}"
Add-Content $ProfileFile -Value "function syslog {Get-EventLog -LogName System -Newest 50}"
Add-Content $ProfileFile -Value ""
Add-Content $ProfileFile -Value "function gco(`$Cmdlet){Get-Command `$Cmdlet -CommandType Cmdlet}"
Add-Content $ProfileFile -Value "function about{Get-Help about_* | Select name, synopsis | Format-Table -AutoSize}"
Add-Content $ProfileFile -Value "function module{Get-Module -ListAvailable | Where-Object {`$_.Path -like `"`$PSHOME*`"}}"
#######################################################################################
## Profil in der aktuellen Sitzung laden
. $PROFILE.CurrentUserAllHosts
#######################################################################################
## Erstelle Regkeys für HKEY_CURRENT_USER\Console
$RegPath1="HKCU:\Console"
Set-Location -Path $RegPath1
## Konsolenfarben setzen
New-ItemProperty . ColorTable00 -type DWORD -value 0x00222827 -Force
New-ItemProperty . ColorTable03 -type DWORD -value 0x00141817 -Force
New-ItemProperty . ColorTable07 -type DWORD -value 0x00f2f8f8 -Force
New-ItemProperty . ColorTable09 -type DWORD -value 0x00efd966 -Force
New-ItemProperty . ColorTable10 -type DWORD -value 0x002ee2a6 -Force
New-ItemProperty . ColorTable12 -type DWORD -value 0x007226f9 -Force
New-ItemProperty . ColorTable14 -type DWORD -value 0x0074dbe6 -Force
## Schriftart und zusätzlich Optionen setzen
New-ItemProperty . CurrentPage -type DWORD -value 0x00000003 -Force
New-ItemProperty . CursorSize -type DWORD -value 0x00000019 -Force
New-ItemProperty . EnableColorSelection -type DWORD -value 0x00000000 -Force
New-ItemProperty . ExtendedEditKey -type DWORD -value 0x00000000 -Force
New-ItemProperty . ExtendedEditKeyCustom -type DWORD -value 0x00000000 -Force
New-ItemProperty . FaceName -type STRING -value "Consolas" -Force
New-ItemProperty . FontFamily -type DWORD -value 0x00000036 -Force
New-ItemProperty . FontSize -type DWORD -value 0x000e0000 -Force
New-ItemProperty . FontWeight -type DWORD -value 0x00000190 -Force
New-ItemProperty . FullScreen -type DWORD -value 0x00000000 -Force
New-ItemProperty . HistoryBufferSize -type DWORD -value 0x00000032 -Force
New-ItemProperty . HistoryNoDup -type DWORD -value 0x00000000 -Force
New-ItemProperty . InsertMode -type DWORD -value 0x00000001 -Force
New-ItemProperty . LoadConIme -type DWORD -value 0x00000001 -Force
New-ItemProperty . NumberOfHistoryBuffers -type DWORD -value 0x00000004 -Force
New-ItemProperty . PopupColors -type DWORD -value 0x000000f5 -Force
New-ItemProperty . QuickEdit -type DWORD -value 0x00000001 -Force
New-ItemProperty . ScreenBufferSize -type DWORD -value 0x270f00c8 -Force
New-ItemProperty . ScreenColors -type DWORD -value 0x0000000f -Force
New-ItemProperty . TrimLeadingZeros -type DWORD -value 0x00000000 -Force
New-ItemProperty . WindowSize -type DWORD -value 0x003600c8 -Force
New-ItemProperty . WordDelimiters -type DWORD -value 0x00000000 -Force
New-ItemProperty . WindowPosition -type DWORD -value 0x003c00dc -Force
#######################################################################################
## Erstelle Regkeys für HKEY_CURRENT_USER\Console\%SystemRoot%_System32_WindowsPowerShell_v1.0_powershell.exe
$RegPath2="HKCU:\Console\%SystemRoot%_system32_WindowsPowerShell_v1.0_powershell.exe"
$CheckRegKey2 = Test-Path -Path $RegPath2
if ($CheckRegKey2 -eq $true) {
Clear-Host
Remove-Item -Path $RegPath2 -Recurse -Force
Write-Host "`nRegistrieschlüssel ist vorhanden und wird gelöscht!`n" -ForegroundColor Yellow
New-Item -Path "HKCU:\Console" -Name "%SystemRoot%_system32_WindowsPowerShell_v1.0_powershell.exe" -Force
Write-Host "`nRegistrieschlüssel ist nicht vorhanden und wird angelegt.`n" -ForegroundColor Green
} else {
Clear-Host
New-Item -Path "HKCU:\Console" -Name "%SystemRoot%_system32_WindowsPowerShell_v1.0_powershell.exe" -Force
Write-Host "`nRegistrieschlüssel ist nicht vorhanden und wird angelegt.`n" -ForegroundColor Green
}
Set-Location -Path $RegPath2
## Konsolenfarben setzen
New-ItemProperty . ColorTable00 -type DWORD -value 0x00222827 -Force
New-ItemProperty . ColorTable03 -type DWORD -value 0x00141817 -Force
New-ItemProperty . ColorTable07 -type DWORD -value 0x00f2f8f8 -Force
New-ItemProperty . ColorTable09 -type DWORD -value 0x00efd966 -Force
New-ItemProperty . ColorTable10 -type DWORD -value 0x002ee2a6 -Force
New-ItemProperty . ColorTable12 -type DWORD -value 0x007226f9 -Force
New-ItemProperty . ColorTable14 -type DWORD -value 0x0074dbe6 -Force
## Schriftart und zusätzlich Optionen setzen
New-ItemProperty . CurrentPage -type DWORD -value 0x00000003 -Force
New-ItemProperty . CursorSize -type DWORD -value 0x00000019 -Force
New-ItemProperty . EnableColorSelection -type DWORD -value 0x00000000 -Force
New-ItemProperty . ExtendedEditKey -type DWORD -value 0x00000000 -Force
New-ItemProperty . ExtendedEditKeyCustom -type DWORD -value 0x00000000 -Force
New-ItemProperty . FaceName -type STRING -value "Consolas" -Force
New-ItemProperty . FontFamily -type DWORD -value 0x00000036 -Force
New-ItemProperty . FontSize -type DWORD -value 0x000e0000 -Force
New-ItemProperty . FontWeight -type DWORD -value 0x00000190 -Force
New-ItemProperty . FullScreen -type DWORD -value 0x00000000 -Force
New-ItemProperty . HistoryBufferSize -type DWORD -value 0x00000032 -Force
New-ItemProperty . HistoryNoDup -type DWORD -value 0x00000000 -Force
New-ItemProperty . InsertMode -type DWORD -value 0x00000001 -Force
New-ItemProperty . LoadConIme -type DWORD -value 0x00000001 -Force
New-ItemProperty . NumberOfHistoryBuffers -type DWORD -value 0x00000004 -Force
New-ItemProperty . PopupColors -type DWORD -value 0x000000f5 -Force
New-ItemProperty . QuickEdit -type DWORD -value 0x00000001 -Force
New-ItemProperty . ScreenBufferSize -type DWORD -value 0x270f00c8 -Force
New-ItemProperty . ScreenColors -type DWORD -value 0x0000000f -Force
New-ItemProperty . TrimLeadingZeros -type DWORD -value 0x00000000 -Force
New-ItemProperty . WindowSize -type DWORD -value 0x003600c8 -Force
New-ItemProperty . WordDelimiters -type DWORD -value 0x00000000 -Force
New-ItemProperty . WindowPosition -type DWORD -value 0x003c00dc -Force
#######################################################################################
## Kopiere Regkeys für HKEY_CURRENT_USER\Console\Windows PowerShell
$RegPath3="HKCU:\Console\Windows PowerShell"
$CheckRegKey3 = Test-Path -Path $RegPath3
if ($CheckRegKey3 -eq $true) {
Clear-Host
Remove-Item -Path $RegPath3 -Recurse -Force
Write-Host "`nRegistrieschlüssel ist vorhanden und wird gelöscht!`n" -ForegroundColor Yellow
New-Item -Path "HKCU:\Console" -Name "Windows PowerShell" -Force
Write-Host "`nRegistrieschlüssel ist nicht vorhanden und wird angelegt.`n" -ForegroundColor Green
} else {
Clear-Host
New-Item -Path "HKCU:\Console" -Name "Windows PowerShell" -Force
Write-Host "`nRegistrieschlüssel ist nicht vorhanden und wird angelegt.`n" -ForegroundColor Green
}
Set-Location -Path $RegPath3
## Konsolenfarben setzen
New-ItemProperty . ColorTable00 -type DWORD -value 0x00222827 -Force
New-ItemProperty . ColorTable03 -type DWORD -value 0x00141817 -Force
New-ItemProperty . ColorTable07 -type DWORD -value 0x00f2f8f8 -Force
New-ItemProperty . ColorTable09 -type DWORD -value 0x00efd966 -Force
New-ItemProperty . ColorTable10 -type DWORD -value 0x002ee2a6 -Force
New-ItemProperty . ColorTable12 -type DWORD -value 0x007226f9 -Force
New-ItemProperty . ColorTable14 -type DWORD -value 0x0074dbe6 -Force
## Schriftart und zusätzlich Optionen setzen
New-ItemProperty . CurrentPage -type DWORD -value 0x00000003 -Force
New-ItemProperty . CursorSize -type DWORD -value 0x00000019 -Force
New-ItemProperty . EnableColorSelection -type DWORD -value 0x00000000 -Force
New-ItemProperty . ExtendedEditKey -type DWORD -value 0x00000000 -Force
New-ItemProperty . ExtendedEditKeyCustom -type DWORD -value 0x00000000 -Force
New-ItemProperty . FaceName -type STRING -value "Consolas" -Force
New-ItemProperty . FontFamily -type DWORD -value 0x00000036 -Force
New-ItemProperty . FontSize -type DWORD -value 0x000e0000 -Force
New-ItemProperty . FontWeight -type DWORD -value 0x00000190 -Force
New-ItemProperty . FullScreen -type DWORD -value 0x00000000 -Force
New-ItemProperty . HistoryBufferSize -type DWORD -value 0x00000032 -Force
New-ItemProperty . HistoryNoDup -type DWORD -value 0x00000000 -Force
New-ItemProperty . InsertMode -type DWORD -value 0x00000001 -Force
New-ItemProperty . LoadConIme -type DWORD -value 0x00000001 -Force
New-ItemProperty . NumberOfHistoryBuffers -type DWORD -value 0x00000004 -Force
New-ItemProperty . PopupColors -type DWORD -value 0x000000f5 -Force
New-ItemProperty . QuickEdit -type DWORD -value 0x00000001 -Force
New-ItemProperty . ScreenBufferSize -type DWORD -value 0x270f00c8 -Force
New-ItemProperty . ScreenColors -type DWORD -value 0x0000000f -Force
New-ItemProperty . TrimLeadingZeros -type DWORD -value 0x00000000 -Force
New-ItemProperty . WindowSize -type DWORD -value 0x003600c8 -Force
New-ItemProperty . WordDelimiters -type DWORD -value 0x00000000 -Force
New-ItemProperty . WindowPosition -type DWORD -value 0x003c00dc -Force
#######################################################################################
## Powershell Verknüpfung erstellen
$ComObj = New-Object -ComObject Wscript.Shell
$Shortcut = $ComObj.CreateShortcut("$env:USERPROFILE\Desktop\Powershell.lnk")
$ShortCut.TargetPath = "$PSHOME\powershell.exe"
$ShortCut.Hotkey = "CTRL+ALT+P"
$ShortCut.Save()
#######################################################################################
Wie immer freue ich mich über Kommentare und Anregungen.
Viele Grüße
Helmut